As businesses across the globe use video conferencing as a constant tool, ensuring that your connections are as secure from theft and ‘eavesdropping’ as your network is. What is said in your meetings may be every bit as valuable as the data that flows through your network. The following guide will help make sure that “the walls don’t have ears”.
1. Keep Zoom Up to Date
Zoom is continuously releasing new and improved features for their application. Therefore, it is important that you have the latest version installed.
To update through the desktop-client:
- Open the Zoom application on your system and select “Check for Updates...” from the zoom.us drop-down menu
To download and install new versions through the Zoom site:
- Visit Zoom's Where Do I Download the Latest Version (link is external) page for instructions.
Note: depending on how Zoom was initially installed on your device an admin password may be needed to install updates.
2. Prevent Zoom-bombing
Zoom-bombing is the term for when individuals "gate-crash" Zoom meetings. These uninvited guests share their screens to bombard real attendees with disturbing pornographic and/or violent imagery. Be sure to secure your Zoom with these tips below. For a complete list see Zoom's manual on Securing Zoom Settings (link is external).
2.1 Avoid Hosting Public Meetings
If you share your meeting link on social media or another public location (like a public bCal invite) anyone with the link can join your meeting. Here are some tips you can use to help when needing a public meeting space:
- Do not use your Personal Meeting ID (link is external) (PMI) to host public events. Your PMI is essentially one continuous meeting and people can pop in and out all the time. Learn about meeting ID (link is external).
- Familiarize yourself with Zoom’s settings and features. Understand how to protect your virtual space. e.g., use a Waiting Room (link is external) (additional details on that below). The waiting room is a helpful feature for controlling attendees.
- Password Protect your Zoom Meetings. You can require not just the Meeting ID but also a password to join your Zoom Meeting. You can require a password (link is external) for new meetings, instant meetings, PMI meetings or even phone participants. You can also choose not to include the password in the meeting link.
- Avoid ‘Join Before Host.’ The Join Before Host (link is external) option allows meeting participants to join your meeting before you, as host, start the meeting. It is best that you join first so that you can see who is attending. If you must use the ‘Join Before Host’ option, you should assign a password to protect the meeting.
3. Manage Security Settings
Security icon (link is external): Zoom’s security features, which had previously been accessed throughout the meeting menus, are now grouped together, and found by clicking the Security icon in the meeting menu bar on the host's interface.

You can also lock the Screen Share by default for all your meetings in your web settings.

4. Manage your participants
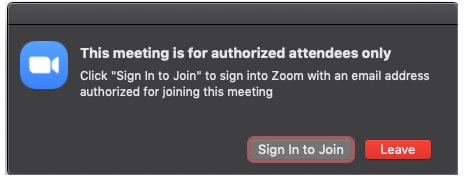
4.1 Allow only signed-in users to join
If someone tries to join your event and isn’t logged into Zoom with the email they were invited through, they will receive this message:

4.2 Lock the meeting:
When you lock a Zoom Meeting after it has started, no new participants can join, even if they have the meeting ID and password (if you have required one). This setting can be found via the security icon in the settings bar.
4.3 Set a password:
Meetings and webinars can require passwords for an added layer of security. Passwords can be set (link is external) at the individual meeting level or enabled at the user, group, or account level for all meetings and webinars. Instructions on setting passwords
4.4 Remove unwanted or disruptive participants:
From the Participants menu, hover over a participant’s name, and several options will appear, including Remove.
- When you do remove someone, they can’t rejoin the meeting. But you can toggle your settings to allow removed participants to rejoin, in case you remove the wrong person.
- Alternatively, you can put each participant on a temporary hold, including the attendees’ video and audio connections. Click on someone’s video thumbnail and select Start Attendee On Hold to activate this feature. Click Take Off Hold in the Participants list if/when you’re ready to have them back.
- Hosts can turn participant's video off. This will allow hosts to block unwanted, distracting, or inappropriate gestures on video.
- Hosts can mute/unmute individual participants or all of them at once. Hosts can block unwanted, distracting, or inappropriate noise from other participants. You can also enable Mute Upon Entry in your settings to keep the noise down in large meetings.
4.5 Turn off file transfer:
In-meeting file transfer allows people to share files through the in-meeting chat. Turn this off (link is external) to keep the chat from getting unwanted content.
4.6 Turn off annotation:
You and your attendees can doodle and mark up content together using annotations during screen share. You can disable the annotation feature (link is external) in your Zoom settings to prevent people from using it.
4.7 Disable private chat:
Zoom has in-meeting chat for everyone or participants can message each other privately. Restrict participants’ ability (link is external) to chat with each another during your meeting. This prevents anyone from getting messages during the meeting.
4.8 Use a Waiting Room:
When attendees join a meeting, place them in a waiting room and require the host to admit them individually. Enabling the waiting room automatically disables the setting for allowing attendees to join before host
Meeting hosts can customize Waiting Room settings for additional control, and you can even personalize the message (link is external) people see when they hit the Waiting Room so they know they’re in the right spot.
5. Secure Zoom Recordings
On occasion, you may need to record the audio and/or video of a Zoom meeting to share with others. It’s important that these files are stored appropriately according to the protection level of the data captured in the recording.
5.1 Cloud Recordings
The only time you may want to consider using the “Record to the Cloud” option is if you want to temporarily (90 days) make recordings available to others to download or stream directly from the Zoom Cloud. Cloud recordings auto-delete after 90 days. If you use cloud recordings you must secure them (see instructions below).
Recording to the cloud: Read this support article on how to record to the Zoom Cloud (link is external)
Note: Zoom Cloud recordings may be found by others due to the default naming conventions Zoom uses.
5.1.1 Enabling authentication options:
To prevent your cloud recordings from being discovered publicly, you must enable the “Only authenticated users can view cloud recordings (link is external)” option under your user/account “Recordings” settings.
5.1.2 Password-protection of cloud recordings:
"Require password to access shared cloud recordings" is the default setting on all accounts. This means password protection will be enforced for shared cloud recordings. A random password will be generated which can be modified by the account holder. This setting has been automatically applied to recordings made after Apr. 12, 2020.
Be aware: Although you can turn off the "Require Password" and "Only authenticated users can view cloud recordings" options, the recordings are not secure and will make them publicly accessible. We recommend using one or both options unless your recording is intended for public use.
IT Support LA is dedicated to protecting privacy both on Zoom and within your network; safeguarding your information assets and infrastructure; identifying and mitigating vulnerabilities; detecting, responding, and recovering from cyber incidents; and promoting cyber awareness and education. We stand ready to assist and support you in your cyber security risk management efforts. Remember - cyber security is everyone’s responsibility!
Want to make sure your telecommuters and your network are protected? Take advantage of our FREE Network & Security Assessment that will reveal any vulnerabilities in your system and give you peace of mind.
Your New and Redefined IT Experience Begins with a FREE Consultation.
Give us a call or schedule online today!
Yes, I want to know if my network is secure!

CALL US TODAY
818-805-0909


